Educational BoosterPack demo
The Educational BoosterPack is a daughterboard for the TI Launchpad low-cost development boards. The BeagleBone LaunchPad Cape is an adapter board that works with the BeagleBone to enable connections to BoosterPacks. More information about both boards is provided at the links below. This page provides a demo that can be run with recent versions of BoneScript provided on BeagleBone.
To run the below demo code, you need an installation of BoneScript 0.2 or newer. Simply put your BeagleBone on the network and you should be able to get a connection. If it is plugged in via USB to your computer, it should connect automatically. If it is elsewhere on the network, you will need to input your IP address in the dialog box above and press ENTER. Once you have a connection, click run. To halt the code, refresh the browser page as the code is actually running within the browser page and sending messages to your board at each of the BoneScript library calls.
To have this code run on start-up, start the Cloud9 IDE and paste the code into the editor. Then, save the file and drag it into the 'autorun' folder. To stop it from executing, pull it out of the 'autorun' folder.
Note: Currently the J3 and J4 headers are not populated on the
BeagleBone LaunchPad Cape. If J3 is populated, the BoosterPack could
actually damage BeagleBone, because the analog signals would be at too
high a voltage level. The designer should perform voltage level
translation on future revisions.
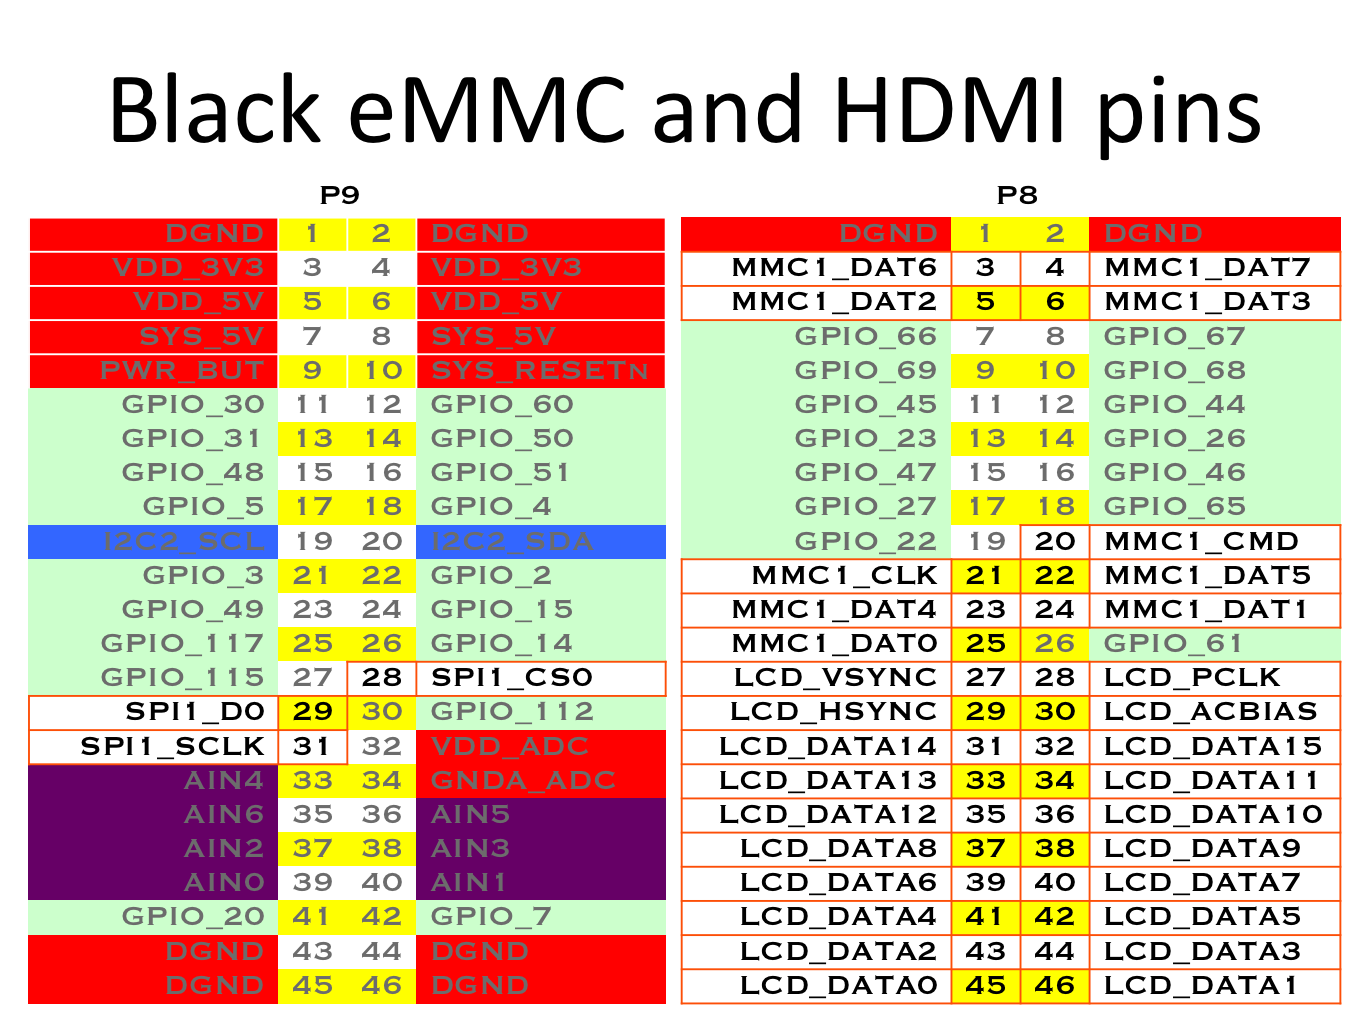
Note: Some of the pins are connected at places used by the eMMC on
BeagleBone Black. These connections should be moved by the
designer on future revisions to unused pins.
Note: The BeagleBone LaunchPad Cape does not include an EEPROM for
indentification by BeagleBone. This means that it cannot be detected. The
designer should include a cape EEPROM on future revisions.
Demo code
// Please see http://beagleboard.org/Support/bone101/#headers
// and scroll down for pins used by the eMMC and HDMI.
var b=require('bonescript');
var LED_RED='P9_25';
var LED_GREEN='P9_27';
var LED_BLUE='P8_3'; // Cannot be used when eMMC not in reset
var SPKR='P9_16';
var LCD_CLK='P9_22';
var LCD_DATA='P9_18';
var LCD_RESET='P8_4'; // Cannot be used when eMMC not in reset
b.pinMode(LED_RED, b.OUTPUT);
b.pinMode(LED_GREEN, b.OUTPUT);
b.pinMode(SPKR, b.OUTPUT);
doSpkrOn();
function doSpkrOn() {
    console.log('Playing 440Hz square wave on speaker');
    b.analogWrite(SPKR, 0.5, 440, onSpkrOn);
}
function onSpkrOn(x) {
    console.log('Waiting .1 second');
    setTimeout(doSpkrOff, 100);
}
function doSpkrOff() {
    console.log('Halting speaker');
    b.analogWrite(SPKR, 0, 440, onSpkrOff);
}
function onSpkrOff(x) {
    doRedHigh();
}
function doRedHigh() {
    console.log('Setting LED_RED high');
    b.digitalWrite(LED_RED, b.HIGH, onRedHigh);
}
function onRedHigh(x) {
    console.log('Waiting 1 second');
    setTimeout(onRedTimeout, 1000);
}
function onRedTimeout() {
    console.log('Setting LED_RED low');
    b.digitalWrite(LED_RED, b.LOW, onRedLow);
}
function onRedLow() {
    doGreenHigh();
}
function doGreenHigh() {
    console.log('Setting LED_GREEN high');
    b.digitalWrite(LED_GREEN, b.HIGH, onGreenHigh);
}
function onGreenHigh() {
    console.log('Waiting 1 second');
    setTimeout(onGreenTimeout, 1000);
}
function onGreenTimeout() {
    console.log('Setting LED_GREEN low');
    b.digitalWrite(LED_GREEN, b.LOW, onGreenLow);
}
function onGreenLow() {
    doSpkrOn();
}
 Except where otherwise noted, content on this site is licensed under a Creative Commons Attribution-Share Alike 3.0 license